2023-11-26
Creating a macOS MenuBar app with React Native
Using NSMenu, NSPopover and NSWindow
Contents
Introduction
MenuBar apps allows users to quickly access apps content wherever they are in the operating system. They can work as an extension of your app, providing useful shortcuts for most used features or work as menubar only apps. In this article we will discuss three different ways of creating menubar only app either with NSMenu, NSPopover or plain NSWindow.
What's the difference between NSMenu, NSPopover and NSWindow?
NSPopover renders is a container for content displayed in a floating window with an anchor. It allows you to render your components as is.
On the other hand NSMenu is an API that allows you to build native menubar experiences that follow MacOS appearance. It has a subset of predefined properties that you can set. To create this type of menu you will need a third party library, because you can't directly map JSX to custom AppKit elements. I've created a library that creates this type of mapping called: react-native-menubar-extra .
And lastly, you can create a menubar app with a plain NSWindow. This is the most flexible option, but it requires you to handle all the logic yourself. It can lead to less bugs than NSPopover when embedding custom views.
Setup your project
Firstly, lets follow the instructions of creating an app with React Native macOS, here: https://microsoft.github.io/react-native-windows/docs/rnm-getting-started
npx react-native@latest init MenuBarApp --template "react-native@^0.72.0" The stable version of MacOS might be different by the time you are reading this article so check out react-native-macos docs.
After this step is done cd into newly initialised project and run:
npx react-native-macos-init This command adds macos support for your React Native app. Next let's open macos folder in Xcode.
xed -b macosThis should open your Xcode window, next open AppDelegate.h.
I will be using Objective-C in this article, there is a similar article from Oscar Franco showing how to use NSPopover in Swift (It doesn't cover NSMenu), check it out here.
Using NSPopover
If you want to use NSMenu skip to the next section.
Let's get started by adding two new properties:
@interface AppDelegate : RCTAppDelegate
@property(nonatomic, strong) NSPopover *popover;
@property(nonatomic, strong) NSStatusItem *statusItem;
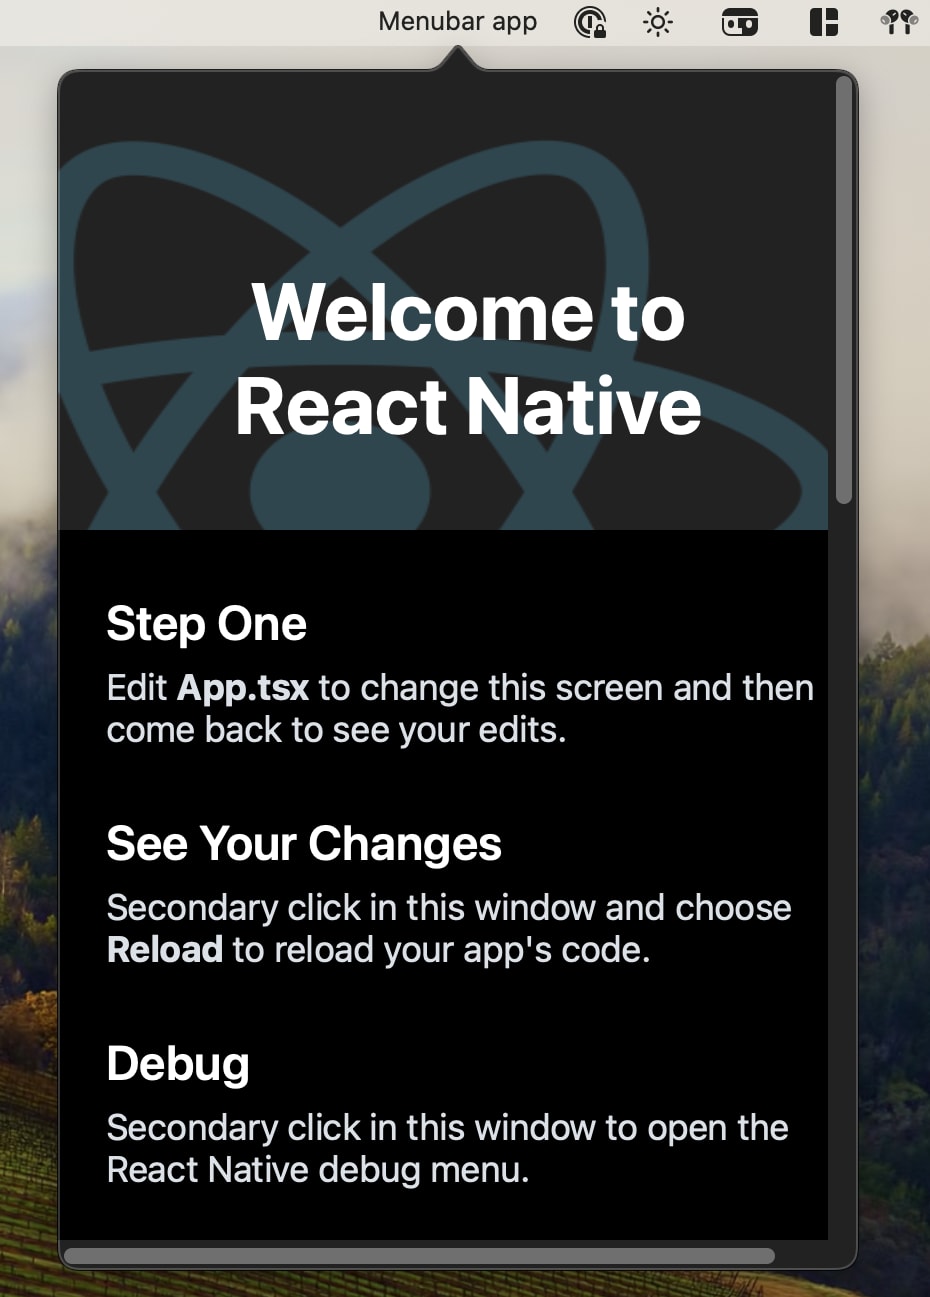
@endOne will be used to store NSPopover (floating container to render content) and the second one stores NSStatusItem an individual element displayed in the system menu bar.
Next inside of AppDelegate.mm, replace the implementation of applicationDidFinishLaunching:
- (void)applicationDidFinishLaunching:(NSNotification *)notification
{
  self.moduleName = @"MenuBarApp";
  self.initialProps = @{};

  // Setup React Native for both architectures.
  NSApplication *application = [notification object];
  NSDictionary *launchOptions = [notification userInfo];
  BOOL enableTM = NO;
#if RCT_NEW_ARCH_ENABLED
  enableTM = self.turboModuleEnabled;
#endif
  RCTAppSetupPrepareApp(application, enableTM);

  if (!self.bridge) {
    self.bridge = [self createBridgeWithDelegate:self launchOptions:launchOptions];
  }
#if RCT_NEW_ARCH_ENABLED
  self.bridgeAdapter = [[RCTSurfacePresenterBridgeAdapter alloc] initWithBridge:self.bridge
                                                               contextContainer:_contextContainer];
  self.bridge.surfacePresenter = self.bridgeAdapter.surfacePresenter;

  [self unstable_registerLegacyComponents];
#endif

  // Create React Native rootView
  RCTPlatformView *rootView = [self createRootViewWithBridge:self.bridge moduleName:self.moduleName initProps:self.initialProps];
  NSViewController *viewController = [[NSViewController alloc] init];
  viewController.view = rootView;

  _popover = [[NSPopover alloc] init];
  _popover.contentSize = NSMakeSize(400, 600);
  // Set popover content view as React Native rootView
  _popover.contentViewController = viewController;

  // Expands rootView to Popover arrow.
  if (@available(macOS 14.0, *)) {
    _popover.hasFullSizeContent = YES;
  }
  _statusItem = [[NSStatusBar systemStatusBar] statusItemWithLength:NSVariableStatusItemLength];

  [_statusItem.button setTitle:@"Menubar app"];
  [_statusItem.button setAction:@selector(toggleMenu:)];
}
First part of the code is related to proper initialisation of React Native for both architectures. It comes from RCTAppDelegate:applicationDidFinishLaunching method. RCTAppDelegate is an abstraction which hides some of the RN internals from us, check out the source code here. We need to override it because this method by default creates and shows a new NSWindow.
If you don't want to use new architecture you can remove the #if RCT_NEW_ARCH_ENABLED block.
The hasFullSizeContent property is available only on macOS 14 and above. It allows you to expand your content to the popover arrow. I've created a tweet about it:
Tip: If you have a React Native MacOS MenuBar app you can set
— Oskar Kwaśniewski (@o_kwasniewski) November 26, 2023hasFullSizeContenton NSPopover for MacOS 14+.
This expands your RN view to also render content in the arrow, which looks a lot better✨
More on this in an upcoming blog post pic.twitter.com/Joaf8A7yJ0
In order to handle menu opening and closing add this method in your AppDelegate:
- (void)toggleMenu:(NSMenuItem *)sender
{
if (_popover.isShown) {
[_popover performClose:sender];
} else {
[_popover showRelativeToRect:_statusItem.button.bounds ofView:_statusItem.button preferredEdge:NSRectEdgeMinY];
[_popover.contentViewController.view.window becomeKeyWindow];
}
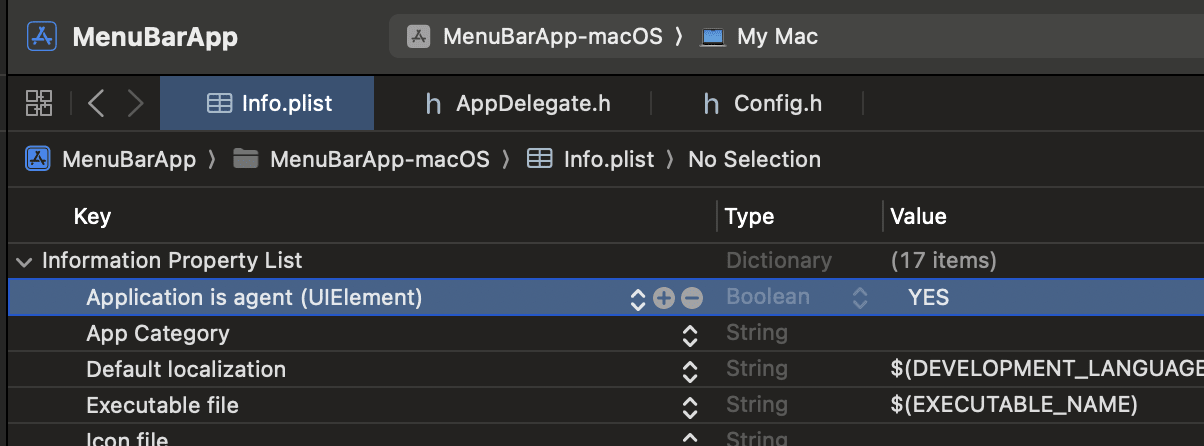
}Next important step is to go to your Info.plist and add new property Application is agent (UIElement) and set it to YES. This will remove your app icon from Dock.
Using NSMenu
In order to use NSMenu you need to install additional dependency:
yarn add react-native-menubar-extraand install pods:
cd macos && pod installNext go to your App.tsx and change it to looks like so:
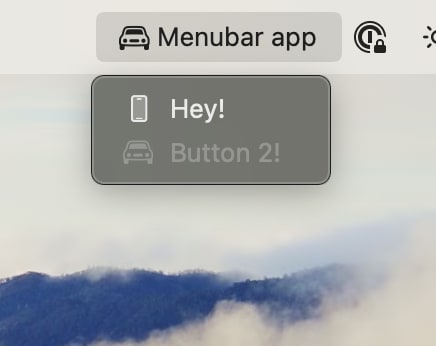
import React from 'react';
import {MenuBarExtraItem, MenubarExtraView} from 'react-native-menubar-extra';
function App(): JSX.Element {
return (
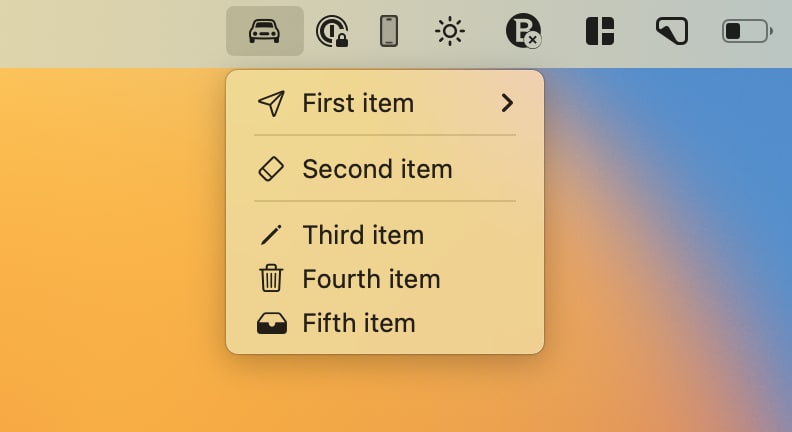
<MenubarExtraView title="Menubar app">
<MenuBarExtraItem title="Hey!" icon="phone" />
<MenuBarExtraItem title="Button 2!" icon="car" />
</MenubarExtraView>
);
}
Change AppDelegate.h to store RCTPlatformView:
@interface AppDelegate : RCTAppDelegate

@property(nonatomic, strong) RCTPlatformView *rootView;

@end
We need to store rootView of our app to prevent it from getting retained.
In AppDelegate.mm remove the unused toggleMenu method and update the applicationDidFinishLaunching method:
- (void)applicationDidFinishLaunching:(NSNotification *)notification
{
  // Logic to init React Native is the same as in previous example.
  // Store reference to rootView to prevent it from being retained.
  self.rootView = [self createRootViewWithBridge:self.bridge moduleName:self.moduleName initProps:self.initialProps];
}
Congratulations! Now you have a working Menubar app leveraging the NSMenu API.
Checkout react-native-menubar-extra docs in repository readme: https://github.com/okwasniewski/react-native-menubar-extra
Using NSWindow
In order to use NSWindow we need to create a new NSWindow and set it's properties to behave like a Popover window. Remember to remove references to react-native-menubar-extra from your App.tsx.
Firstly, let's update the AppDelegate.h to store NSWindow:
@interface AppDelegate : RCTAppDelegate

@property(nonatomic, strong) NSWindow *popoverWindow;
@property(nonatomic, strong) NSStatusItem *statusItem;

@end
Next, let's update the AppDelegate.mm:
- (void)applicationDidFinishLaunching:(NSNotification *)notification
{
// Logic to init React Native is the same as in previous example.
RCTPlatformView *rootView = [self createRootViewWithBridge:self.bridge moduleName:self.moduleName initProps:self.initialProps];
NSViewController *viewController = [[NSViewController alloc] init];
viewController.view = rootView;
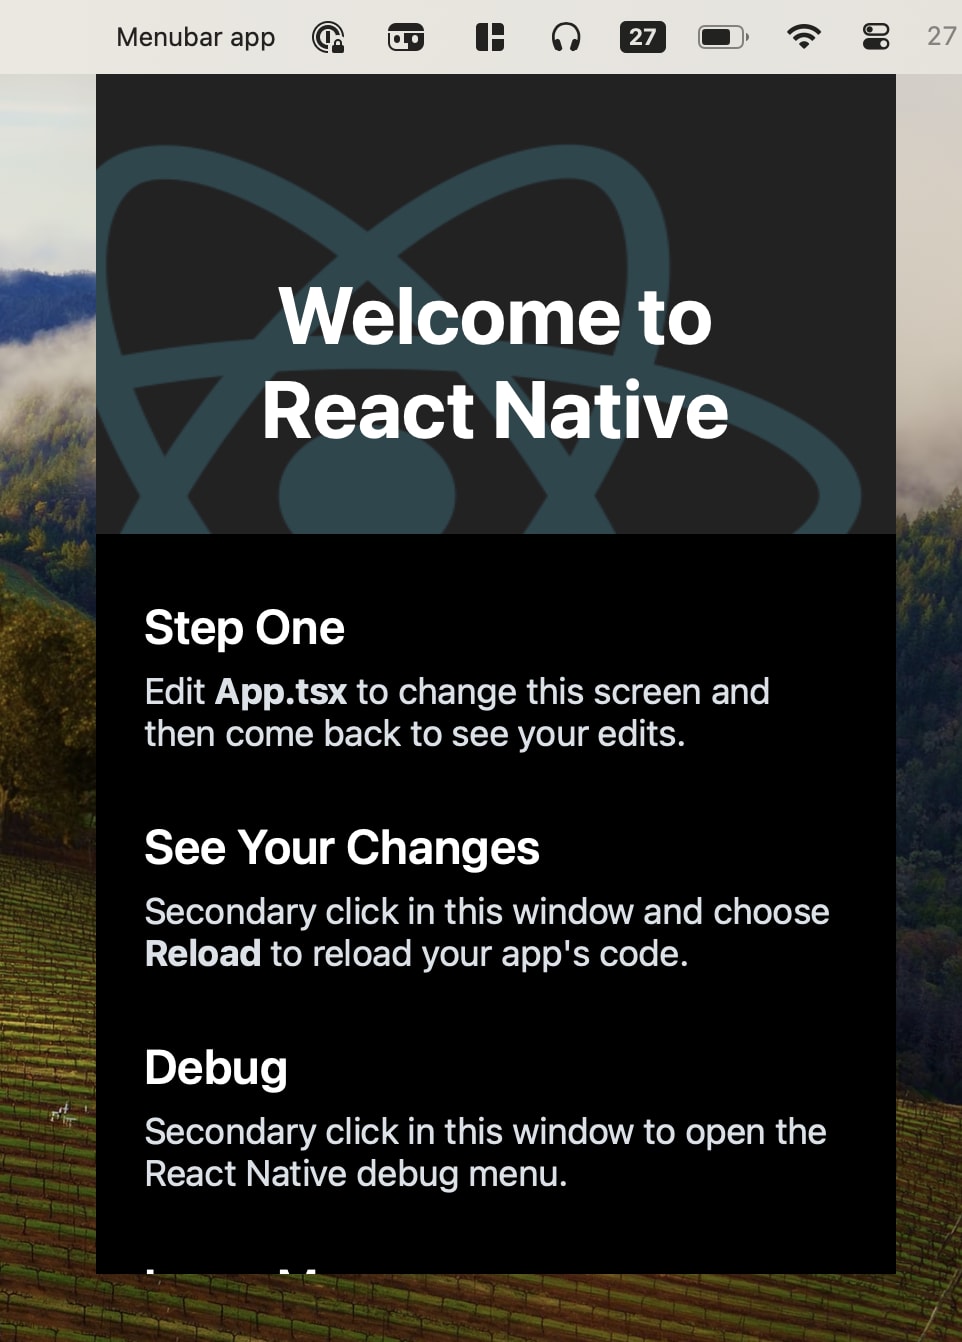
rootView.frame = NSMakeRect(0, 0, 400, 600);
// Init NSWindow and set it's properties to behave like a popover.
_popoverWindow = [[NSWindow alloc] initWithContentRect:NSZeroRect styleMask:NSWindowStyleMaskBorderless backing:NSBackingStoreBuffered defer:NO];
_popoverWindow.contentViewController = viewController;
_popoverWindow.autorecalculatesKeyViewLoop = YES;
_popoverWindow.level = NSPopUpMenuWindowLevel;
_statusItem = [[NSStatusBar systemStatusBar] statusItemWithLength:NSVariableStatusItemLength];
[_statusItem.button setTitle:@"Menubar app"];
[_statusItem.button setAction:@selector(toggleMenu:)];
}If you want to know more on styling NSWindow check out this Youtube video: https://www.youtube.com/watch?v=geJw6q6raXE
and bring back the toggleMenu method:
- (void)toggleMenu:(NSMenuItem *)sender
{
  if ([_popoverWindow isVisible]) {
    [_popoverWindow orderOut:self];
  } else {
    CGPoint origin = _statusItem.button.window.frame.origin;
    [_popoverWindow setFrameTopLeftPoint:origin];
    [_popoverWindow makeKeyAndOrderFront:self];
    [_popoverWindow.contentViewController.view.window becomeKeyWindow];
  }
}
This is how your app should look like:
You can find the code for this article here.
That's all
Thanks for reading! I hope you found this article useful. If you have any questions or feedback feel free to reach out to me on Twitter.